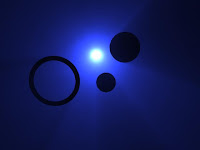
FOG LIGHT/GOD RAYS IN MENTAL RAY Of course, it's not easy as with most things in MR but here it is. 1. Create a poly object (cube) which will act as a 'container for your fog. The smaller the container the less calculations Maya has to make. 2. Create a light that will be your fog light. Turn on raytrace shadows with trace depth 5. (use MR lights for cooler results, i.e. attach a physical light to a spotlight) 3. Make sure your objects are within your container. 4. Create a shader (lambert) that you will apply to your container. 5. Open the lamberts 2sg node and hook a transmat node to it's MR custom shaders -material shader and shadow shader. This will make the container's geometry invisible to the renderer. 6.Connect a parti_volume node to the volume shader slot. 7. Turn up the parti_volume's scatter a bit. 8. In the parti_volumes attributes, link your light to it through the light linking drop down. 9. In your render globals, Features...turn on auto volume volume...