Flicker Free animation VRAY for Maya The tough thing about Vray is that for the most part it's default render settings are most set up for interior still frames or arch-viz camera fly throughs. When you want objects moving through the scene, Vray's irradience maps are calculated differently each frame....which leads to flickering GI. I've found a great tutorial that explains the irradiance map prepass method, which works similar to motion blur pre and post frame calculation. What it seems to do is pre-calculate the GI maps then blend them + or - X amount of frames so that flickering is eliminated. It's a two step process, but way faster than brute force GI methods. http://www.workshop.mintviz.com/tutorials/flicker-free-animation-using-vray/
Posts
- Get link
- X
- Other Apps
VrayForMaya Nederhorst Settings Here's some pretty decent vray settings for animation. There's so many things to play with in the render settings - it can get out of hand. According to this video, the Nederhost settings attempt to keep all of your quality control in the Adaptive DMC section. I can dig it. **Great tip from the video. Switch to Fixed rate rather than adaptive DMC with a low sample rate for fast test renders. I have to render layers set up. One with DMC, one with Fixed for fast render quality switching. http://www.youtube.com/watch?v=ZURdN48My9I
- Get link
- X
- Other Apps
Pose 2 Shelf Gotta give props to simple, good scripts. I was posing out some wing shapes on a character and I was looking for a simple pose storing script. Here it is. http://www.creativecrash.com/maya/downloads/scripts-plugins/animation/c/pose-2-shelf Simply select your controls, name your pose and BAMM it saves the pose as a button to your shelf. Gotta like that stuff.
- Get link
- X
- Other Apps
V-RAY for MAYA shader library Yes! For you people out there who use Vray, I highly recommend you grab this shader library tool by Oliver Markowski. It comes with a shwack of presets, a test sphere file that you can create and export your own shaders and a very cool GUI for Maya. It's a bit of work to install and NOTE: you have to convert all of your .jpg preview files to .png files for them to be viewable in the GUI. But when it's up and running - this is a great tool for shader organization.
- Get link
- X
- Other Apps
Constraint Burn + Extrude along face normal burn Did I miss something on an update or have I just done too many bad things to my brain lately? I always used to use the 1W0 attribute to animate a constraint on and off. Now it seems there is a Blend Point 1 attribute that does the job. When you create a constraint this is added in your channel box right after visibility. Anyway, had me going in circles for a bit. And another one! Making even indents or extrudes on objects...not so intuitive in Maya. I needed to make the indents on a mouse button and after my extrude I was looking for all types of settings on the move tool. The 'normals' only works on nurbs and verts. To move faces inward or outwards along normals you need to use the edit mesh/transform components tool. Jeez.
- Get link
- X
- Other Apps
THE ZEN Ahhh Maya transfer attributes...why oh why do you add a history node to the stack when transferring. I had a situation where I needed to match the vertex positions of one object to another. The problem is that it adds a non-deletable node to the target's history. If you delete it, the tweak reverts. Lame. Why can't it just query the vertex position of the base object and copy those values to the target verts? Well thankfully there's a script that does just that. It the ZEN yo! http://dissentgraphics.com/tools/zentools/ There are a big shwack of scripts in this suite but the tool I am talking about is in the mel folder. It's called doZenTransferPointPositions.mel Select your base object and your target verts and run it. SNAP. Vert positions copied.
- Get link
- X
- Other Apps
Automation automation....au-to-mation I've been out of the rigging loop for a while but man there are some sweet new tools. Anzovin's The Setup Machine 2 is pretty damn sweet. But here's a niiiice reverse foot setup script that puts in all of your toe roll, heel roll etc etc automatically. Gotta dig it! The script is over at Creative Crash but here's a video showing it's slickness http://www.youtube.com/watch?v=mIDLIY5Ls5o
- Get link
- X
- Other Apps
Lovin' VRAY for Maya's VRAY Blend material Sometimes the most simple things tweak my brain. I remember the pain of having to use mix8 nodes in Mental Ray. This mucho bettero. 1. slap down a vray blend MTL. 2. Throw a semi transparent shader in as your base. 3. add in another shader with a blend amount or use a texture to determine blend amounts. That's it. Insta-layered shader. Awesome.
- Get link
- X
- Other Apps
GOODBYE MENTAL RAY! After going over digital tutor's introduction to vray for maya, I'm pretty convinced that it's far better than MR. With GI, motion blur, caustics, blurry relflections all on - I can still get decent render quality and times....on my laptop. I recommend this Digital Tutor tut if you are thinking of dropping into VRAY. http://www.digitaltutors.com/11/training.php?pid=431
- Get link
- X
- Other Apps
XVID AUDIO PROBLEMS IN PREMIERE So you're cutting in Adobe premiere Cs5 and some of your video has the Xvideo codec applied. For some reason Premiere can't read your audio. Well, it's well documented that Adobe considers Premiere as a DV editing software and that the Xvid codec is for presentation only. BOOOO. The only solution is to extract your audio with an external program as a .wav and bring that into Premiere. AoA audio extrator......Free and it works. http://www.aoamedia.com/audioextractor.htm
- Get link
- X
- Other Apps
NCLOTH SCALE Here's one that briefly burned me today and I thought I had a blog post of it. If you've created Ncloth and a default preset isn't moving correctly it's most likely that you are not working to 1/10th scale. Because Maya perceives 1 unit as 1 meter (when your prefs are set to cm's), they also built the cloth solver to solve at that scale. Under the Nucleus node there is a space scale attribute that can be set to 0.01 if you are in a pinch but I'd suggest to model to 1/10th to get the most predictable results. **Here's a fantastic whitepaper on the Nucleus solver. http://images.autodesk.com/adsk/files/autodeskmaya_nucleus_whitepaper.pdf
- Get link
- X
- Other Apps
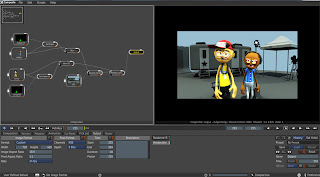
Maya 2011 Vector Blur Things are a bit different now when rendering vector blur. Now Maya has incorporated it into render passes. You no longer need the LM2DV shader. Render out 32 bit EXR with the blur embedded into the pass and break it out into your comp package. This is how to do it with Maya's "composite" package. 1. Separate your FG and BG into render layers. 2. For each layer needing vectors, go into your passes tab in render settings and add a BEAUTY and a mv2Dtoxik (2DmotionVector) pass. 3. In your quality tab make sure your framebuffer is RGBA 4x32bit instead of the default 8. 4. Image format - openEXR 5. Render COMPOSITE - See image for nodes used and also use this dude's video http://www.youtube.com/watch?v=GMKvhKf22r8
- Get link
- X
- Other Apps
Nudge Keys Script When you're working with stepped keys a cool tool to have is a 'nudge selected keys 1 frame left or right' script. I'm no complex MEL guy but here's the code you can slap onto a shelf button... Nudge -1 keyframe -animation keys -option over -relative -timeChange (0 - 1) ; Nudge +1 keyframe -animation keys -option over -relative -timeChange (0 + 1) ;
- Get link
- X
- Other Apps
VLC LOOP SCORE ! Finally figured out how to get the best player hooked up for playblasting. The problem is that it's never had an option for autolooping by default. Here's the config file hack. With clicking on View->Playlist->and then either clicking on Repeat Once or Repeat All, you have to do that every time you open a multimedia file. If you want VLC Media Player to do it by default every time you open a file, open up the file called vlcrc, which is located in the ~/.vlc folder, with a text editor. Look for '# Repeat all (boolean) #loop=0 # Repeat current item (boolean) #repeat=0' inside that file. Change the 0s to 1s & remove the #s and, after doing that, make vlcrc read-only. Then, everytime you open up a multimedia file, the player will loop the multimedia file by default. 64 BIT CODEC WOES ? *Also unfortunately there are a lot of codecs missing in Maya 2011 64 bit Win7. Right now I'm using the FFD show codec which can be found here......
- Get link
- X
- Other Apps
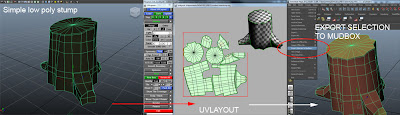
MUDBOX/MAYA CONNECTION There's a nice new feature in Maya now when you want to add sculpted detail to your models via Mudbox. Here's the quick rundown. 1. Model and UV up your Maya model. 2. File/Export selected to Mudbox 3. Sculpt it up. 4. File/send to Maya. You'll get an option box popup and next time you click on Maya BOOM your Mudbox object is back in. NICE
- Get link
- X
- Other Apps
NCLOTH HEIRARCHY Always found it frustrating to have a character/creature with Ncloth imported into a scene then have to move the character away from 0,0,0. The ncloth would snap away like crazy and youd have to relax it etc etc while positioning. Here's a technique to have a fully positionable character have it's Ncloth solve as if it was on 0,0,0 anywhere you position it. Let's say you have a cloth scarf transform constrained to your character's neck 1. Grab the geo of the scarf and parent constrain it to the transform constraint. Now the scarf moves wherever the transform constraint goes AND solves from rest position anywhere you position the character.