nCloth Scale How many times have the endless channel boxes of nCloth wasted my time....? Well here it is, if you are working in centimeters and have cloth no bigger than a meter square, you're fine. Continue. *If you are working on large pieces of nCloth then the SPACE SCALE value on your nucleus node needs adjusting. Smaller values for larger cloth. ALSO your LIFT attribute on your nCloth node has to follow that too. For example if your space scale is 0.01, then your lift should be 0.001 *Any turbulence fields need exponentially higher values as well.
Posts
ANI-TECHNIQUE Woah long time no update. Well, just figured out a nice and natural way to scrub animation while working. Map the 1 and 2 keys of your keyboard to frame forward and backward. Now with your left hand you can 'flip drawings' so to speak while you animate. It feels comfy and if you are a gamer most likely very natural.
UV CHARACTER AFTER RIGGING Interesting technique I found on a post Here is the message that has just been posted: *************** eg: UVing after rigging the character Just make a duplicate of the rigged mesh , preferably before you rig the character Lay out the uv's on the duplicated mesh after rigging the character , plug the last piece of history (of the copied mesh)(the last node before it goes into the shapeNode) into the first meshshape in the "hierarchy" (hypergraph) (normally called something like "meshShapeOriginal" , if the rigged mesh is called "mesh") output or outmesh --> inmesh and then break that connection again. Your mesh will be updated and no history will be added to your rig I normally use this method for mesh changes aswell , if you add new points to the mesh , those points will just have to be added to the skincluster. (and that is the reason why I use a wrapDeform for the face , then changes to the mesh wont screw up m...


LOVIN THE "3" KEY It's just a matter of time before Maya takes the cool things from other packages and implements them. One of the things I liked about Lightwave's modeller was the ability to sub-d preview and render objects at render time by pressing TAB (I think it was). I was playing around with maya 2009 and it seems that by pressing the 3 key and rendering with MR.....bamM!!! smoothed sub-d proxies woot! And if you want to 'freeze' the object into a high poly version, just Modify/Convert/Smooth Mesh Preview to Polygons


Fresnelly Reflections. I couldn't remember the old trick to input a sampler node's facing ratio into a ramp for fresnel relfections. I'm working on a project with a lot of anistropic shaders and in my opinion, the MIA material X is lacking in specular highlight control. Found the ol' trick over here.... http://forums.cgsociety.org/showthread.php?f=87&t=350691&highlight=fresnel
DEMO REEL CREATION This is just a self reminder of things I always forget when creating a demo reel. **FRAMES PER SECOND!!!! 24, 30 - SET IN MAYA - RIP FROM NTSC NOT PAL ** TV SAFE ZONES!!! SHRINK FOOTAGE IN PREMIERE ** LEAD TIME AND END SPACE - LEAVE A FEW SECONDS OF BLACK FRAMES AT START & END ** USE GOOD DVD AUTHOR SOFTWARE. TMPGENC DVD AUTHOR IS BEST!
MENTAL RAY TRIX That I always forget. As we all know, MR in a 32 bit situation cannot handle complicated scenes. A neat feature in Maya 2009 is an : *auto conversion of texture files to .map files. If you are using big textures, the .map hack is now available under..... SETTINGS/PREFERENCES / SETTINGS / RENDERING / use optimized textures (auto conversion) ***And here is a great little utility to convert all of your textures files to map files within maya itself. All you have to do is select your textures and it will bake them and re-associate them for you. Awesome. RIESS_IMF_COPY_DOWNLOAD
CREATING nCLOTH UV'S BEFORE DEFORMERS well, have you ever created Ncloth and found that your UV's are sliding like they are being projected? The problem is, you need to create your UV's BEFORE you create your cloth. If you find that your UV's are after your cloth in your history stack, don't dispair. 1. Select your cloth and delete your uv's 2. under nMesh hit 'display input mesh' -this will display your original object before it was clothed. 3. Apply new uv's or transfer to this object and voila...your uv's are pre-deformer. OR 1. Duplicate your cloth object. 2. Delete it's history. 3. Delete cloth's post deformer swimming uv's 4. Transfer the uv's from the duplicated object to your cloth
MOTION PATH VIA IK SPLINE Interesting technique, using the 'offset' value of an IK spline to drive a series of bones along a motion path curve. Of course..it doesn't work on a curve on surface which is what I'm trying to figure out. http://forums.cgsociety.org/showthread.php?f=88&t=259168&highlight=motion+path+tail Flow object on a motion path curve on surface stretches the object like mad.
RECORDING AUDIO FROM ANY VIDEO Sweet. Not really to do with CG but ever watch a youtube video and want to rip the audio from it? I do all the time. Here's a sweet tutorial on how to do it. *he rips to .wav but you can use other recording software to record to MP3. http://www.youtube.com/watch?v=zg3vs7oh32s
STUFF LEARNED ABOUT OBJECT TRAVEL ACROSS SURFACE Oh dear... Sometimes trying to acomplish the most simple things leads to many discoveries about the tools that you use. I will most definitely have to catalogue this because I don't want to have to figure this out in the future.... Techniques to have multiple objects travel across a surface in random different directions while obeying surface normals and directions. My first intuition was to run random instanced particles across a surface and somehow stick them to the surface. This can be done. Make a surface live, sketch particles on, throw down some gravity and get those particles moving... *but what if you need to direct those particles and also have them 'stick on'? Gravity will tell them that if they hit an edge, to fall off the surface. Plus with fields, you can't direct particles as precise as a picky client wants them :) So I figured, why not make the surface a goal? Great! So the particles move towards the vertic...

FLASH RANT Arrgh. When I learned Flash about 10 years ago I thought "wow, this package has a lot of potential". I've just picked it up to re-do my website and I am shocked at the lack of user friendliness. Making a simple hyperlink to a button involves a ridiculous amount of scripting in "actionscript". Now I am all for having scripting in software however simple functions should be script invisible to users. Or accessible via a script history. All easy html funtions should be button or menu driven. And AHH! Having to copy every little detail to every keyframe if you make changes. No way to batch copy attributes or 'apply to all keys'. No linking or referencing Photoshop files which sucks when you want to change layer details. No global resizing without crunching bitmap edges. Anyway, popping up a window is a lesson in patience but here's a link http://www.flepstudio.org/forum/tutorials/649-opening-popup-flash-cs3-javascript.html
ALPHA TRANSPARENCY WHEN IN FRONT OF PRIMARY VIS OFF OBJECTS Absolutely insane amount of time wasted on this one. If you have objects mapped with transparency and there are objects behind it with primary visibility turned off...the alpha in mental ray will pick up that invisible object. Really silly bug. Solution: hide the invisible object instead of primary vis.
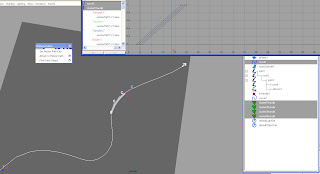
PATH ANIMATION WITH DEFORM Nice. For those path animations where you need the object to bend along the path like for example a snake, worm, tail etc etc. 1. Bind your object(s) to a joint chain 2. Create a spline IK solver 3. Cluster the IK curve 4. Attach those clusters to a motion path 5. Offset each cluster's U value by 1 successive frame down the chain Now you have each cluster following the motion path, driving the spline IK deformations. Sweet!
BAKING CYCLED CURVES I know this feature has been around for a while but - too damn cool again. Finding the right tools implemented in software when needed makes it all that much more exciting. Ever want a character to walk 5 steps in a cycle, stop then start walking again - without TRAX? Well you can bake out a cycled curve by using your bake curve tool and checking on the sparse curve bake option. CURVES/BAKE CHANNEL OPTIONS/SPARSE CURVE BAKE